A more detailed video covering Photosynth from Microsoft Live Labs:
03 December 2007
01 December 2007
GPS-enabled cameras?
All of the complicated work that needs to be done now to geocode (or geotag) photographs could be a thing of the past if founder of SiRF chip company Kanwar Chadha is right. According to Stephen Shankland, blogging on Underexposed at c|net News.com, Chadha is predicting cameras with GPS capability will start hitting the market next year in quantity. Shankland's article covers a range of issues with knowing where photos were taken, particularly if the photos are shared through social networking sites like MySpace, Flickr and SmugMug. While there are privacy and personal security issues with sharing any information about yourself, family and friends, if managed properly adding location data is an opportunity to explore user-generated photographs in new ways.
14 November 2007
More on Photosynth: Wired Science video
The more I see of Photosynth, the more I want to see something like it on the Macintosh, but done better using Core Animation in Leopard.
03 November 2007
Live Maps 3D
Microsoft has integrated Photosynth in Live Maps Virtual Earth 3D (technology preview). No audio in the video, apparently.
Got this from vincenthome.
Why this in a Macintosh blog on GPS? Hoping to see this sort of technology available on the Mac (Virtual Earth 3D requires ActiveX controls)
Got this from vincenthome.
Why this in a Macintosh blog on GPS? Hoping to see this sort of technology available on the Mac (Virtual Earth 3D requires ActiveX controls)
02 November 2007
Using Panoramio
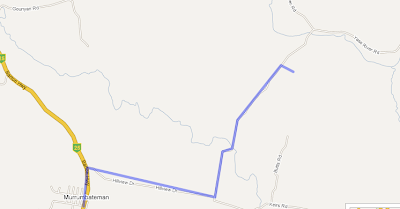
I've been experimenting with Panoramio to simplify serving up geocoded photographs: have a look at a track and the photos from a recent walk in the Warrumbungle National Park. Download the .kmz file and open it in Google Earth. As you change the view on the map, only the photos available in the area covered are included in the list.
29 October 2007
Cool new Leopard Preview feature
I've just come back from a couple of weeks away and while geocoding the photos using the usual tools and now Geotagger from Craig Stanton (Craig also developed the iPhotoToGoogleEarth plugin for iPhoto 6 that I use), I discovered that Preview in Leopard on the Macintosh has a cool new feature when you use it to look at geocoded photographs.
Try this at home:
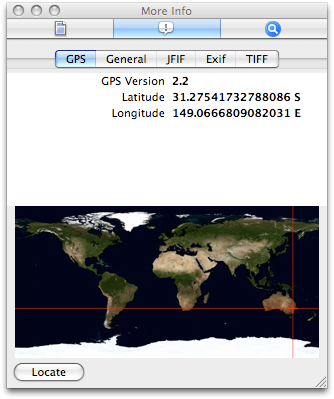
You should see the location data for the photo and the photo's location on the map. Click the Locate button to see the location of the photo in Google Maps.
Try this at home:
- Open a geocoded photo in Preview v4. If you don't have a geocoded photo, here's one of the Warrumbungle National Park from Siding Springs [warning: 4.7MB file] that I prepared earlier. Save it to disk before opening in.
- Choose Inspector from the Tools menu.
- Click the 'i' tab in the Inspector window at the top in the centre.
- Click the GPS tab in the second line of tabs in the Inspector window.

You should see the location data for the photo and the photo's location on the map. Click the Locate button to see the location of the photo in Google Maps.
25 September 2007
Links to Macintosh GPS tools
These are the links to the tools I used in my GPS for the Mac presentation at the Apple University Consortium Conference at the Royal Pines Resort, Gold Coast, on 24 September 2007.
- Graphic Converter
- MacGPS Pro
- GPSBabel +
- PhotoGPSEditor
- iPhoto + iPhotoToGoogleEarth
- Google Earth
- StuffitExpander
- BBEdit
- Safari
Here's the GPS Mac presentation in Acrobat format (.pdf, 668kB), and the paper in Word (.doc, 5.6MB).
16 September 2007
Canberra Nature Parks maps
Here in the ACT the local government has published a series of Acrobat maps of the the local Nature Parks. Download the maps and import them into MacGPS Pro (it will open the PDF file directly). The ones I've tried work with the Geodetic Datum set to GDA94; Map Projection to Transverse Mercator; and UTM Zone to 55H. Calibrate the map using Google Earth (see Calibrating NATMAP Raster Premium Maps for the technique). You should independently verify the calibration before relying on the maps for navigation.
15 September 2007
Google Maps to your GPS via MacGPS Pro
Last weekend we wanted to visit a local winery (Yarrh, pronounced yaar) to try their Sangiovese. From their website map I could see where to go, but thought it would be a good exercise to see if I could transfer the data from Google Maps to my Garmin GPS to guide us there.
Turns out it's quite simple with My Maps (make sure you are logged in to Google: the link takes to you to maps.google.com.au), together with TakItWithMe - Google™ My Maps Converter Beta, and MacGPS Pro.
 Google My Maps line tool
Once logged in to My Maps, create a new map and use the line tool to draw a line from the beginning to the end of the route.
Turns out it's quite simple with My Maps (make sure you are logged in to Google: the link takes to you to maps.google.com.au), together with TakItWithMe - Google™ My Maps Converter Beta, and MacGPS Pro.
 Google My Maps line tool
 Once logged in to My Maps, create a new map and use the line tool to draw a line from the beginning to the end of the route.
Click at each intersection along the route to draw the route. Double click at the destination to finish the route.
Save the map.
 Graphic of the Link to this page link
Click the Link to this page link, and copy the data in the text field under Paste link in email or IM heading.
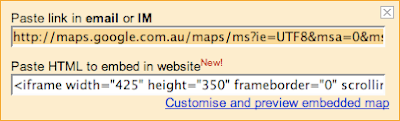
Go to the TakItWithMe website, and paste the data you copied into the Paste in Your Google My Maps URL text field. Click the Download GPX button.

You can then transfer the GPX file to your GPS device, for example using MacGPS Pro. Open MacGPS Pro, open the gpx file you just created, select the route using the Route tool (select the route tool; click one of the waypoints on the route) and transfer the route file to the GPS using the transfer tool.

Save the map.
 Graphic of the Link to this page link
Go to the TakItWithMe website, and paste the data you copied into the Paste in Your Google My Maps URL text field. Click the Download GPX button.

You can then transfer the GPX file to your GPS device, for example using MacGPS Pro. Open MacGPS Pro, open the gpx file you just created, select the route using the Route tool (select the route tool; click one of the waypoints on the route) and transfer the route file to the GPS using the transfer tool.
Another way to do it would be to create Placemarks (rather than a line) in My Maps, then transfer these to MacGPS Pro via a GPX file using this same method. Create a new route in MacGPS Pro between the Placemarks (which become Waypoints in MacGPS Pro). If you have named the Placemarks meaningfully in My Maps you should get a route with meaningful names for Waypoints on the GPS.
Help with My Maps
Google has added a couple of movies to help you with mashups using other people's data or adding your own content to Google Maps My Maps. Here's a featured example of Bo Majewski's personal experiences of Sydney using My Maps.
Google Australian Electoral guide
Not strictly speaking a Macintosh GPS subject, but Google has launched a site on the forthcoming Australian Federal election that includes a find your electorate feature using Google Maps My Maps feature (warning: doesn't work in Safari). You will need to log in to Google to see the option under 'Featured content' on the right ('Australian 2007 Election').
If you have Google Earth you can also download a kmz file to add a map layer for the electorates there.
If you have Google Earth you can also download a kmz file to add a map layer for the electorates there.
05 September 2007
Mercedes (or BMW) for my next car?
At least for driving (if you are in the US and want to buy a new Mercedes) you can now transfer directions from Yahoo! Maps or Google Maps to you car's GPS: it's called Search & Send. BMW has been working with Google to do a similar thing for BMW as well. Watch the videos for Search & Send: it works through a browser so the platform doesn't come into it.
25 August 2007
Calibrating NATMAP Raster Premium maps
The topographic maps on Geoscience Australia's Raster Premium DVDs are stored in .ecw zone files: one file for each of the 8 MGA (Map Grid of Australia) Zones that cover Australia.These files are very large, but you can open them in Graphic Converter on the Macintosh and excise the bit of the map you want and save it as a PICT file for MacGPS Pro. To use these maps on the Macintosh you will have to save them in a format the Mac understands, and calibrate the files.
When you import the PICT file into MacGPS Pro, you have to calibrate it manually because no calibration data is saved with the file when you convert it in Graphic Converter. There isn't any calibration data in the .ecw files, anyway, so it's hardly surprising. You will need the MGA Zone (since each of these files includes the Zone in its title, that's not hard to find), and the north-to-south subzone, represented by a letter between C and X (except I and O). This data (the MGA Zone and the subzone, eg 55J) needs to be entered in the UTM Zone text box in MacGPS Pro.
The easiest way to find this data is to use Google Earth. Google Earth is free but you need to be connected to the Internet for it to work.
In the Google Earth Preferences... 3D View pane, select the Universal Transverse Mercator option in the Show lat/long section.
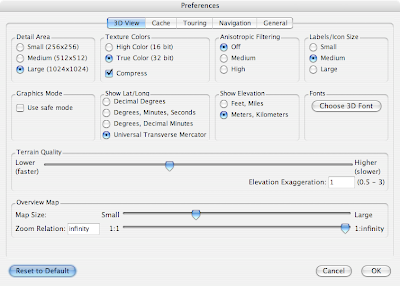
Click OK, and use Google Earth to display on the screen the region where the top left of the map you want to calibrate in MacGPS Pro is. As you move the cursor over the map or image window in Google Earth, the UTM coordinates of the cursor is displayed in the bottom left of the window.
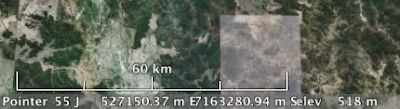
The UTM coordinates you need for MacGPS Pro are the two numbers and the letter following "Pointer": in the image above it's 55J. Note this down. The letter doesn't appear to be case sensitive.
To complete the calibration in MacGPS Pro you will also need the latitude and longitude of at least three points on the map, in degrees, minutes and seconds. Google Earth can help you out with this as well.
Go back to Google Earth Preferences..., and change the Show lat/long setting to Degrees, Minutes, Seconds. Click OK, and find three or more points in Google Earth that you can also see in the map you want to calibrate. As you move the cursor around the window, the Pointer display at the bottom left will show the latitude and longitude in the format you will need to use in MacGPS Pro.

In Google Earth, note the latitude and longitude for at least three points. Choose points spread as widely as possible throughout the map. It's a good idea to note the coordinates of an additional point or two to check the accuracy of the calibration.
Go into MacGPS Pro, import the map file you converted using Graphic Converter, and enter the zone data in the UTM Zone text box. Find the points on the map that you know the latitude and longitude for, click them with the Show Map Location Tool, and enter the data in the Calibrate Map dialogue.
 When you've entered enough points (at least two), the DONE button is undimmed and you can click it to complete the calibration process. Don't forget to put a minus sign (-) in front of the latitude to show it's south of the equator.
Once the map is calibrated, choose Find Coordinates... from the Edit menu to search for another location on the map you know the coordinates for to check the accuracy of the calibration.
NATMAP Raster Premium on the Macintosh
Buoyed by the success with getting the Topoview Raster 2006 topographic maps to the Macintosh without a Windows PC, I decided to try Geoscience Australia's NATMAP Raster Premium 1:250 000 topographic maps for the whole of Australia. So I went down to the local MapWorld store in Canberra (it's in Rudd Street, not on Northbourne Avenue as the address would suggest, on the outside of the Jolimont Centre), and picked up a copy. I also picked up for free copies of the Map Index to NATMAP Topographic Maps and the New South Wales Topographic Map Catalog (West and East) to save navigating the Acrobat .pdf files of the indexes.
Unfortunately as far as I can see the maps aren't available individually on the DVD, so the same process that works for Topoview won't work for the NATMAP product to get them into MacGPS Pro. Graphic Converter does open the Zone files on DVD 2, but of course the images are huge, and geocoding the bits you can save out of the file looks like it would be tedious. More investigation required...
Unfortunately as far as I can see the maps aren't available individually on the DVD, so the same process that works for Topoview won't work for the NATMAP product to get them into MacGPS Pro. Graphic Converter does open the Zone files on DVD 2, but of course the images are huge, and geocoding the bits you can save out of the file looks like it would be tedious. More investigation required...
23 August 2007
Dispensing with the PC
Thanks to Tony, and Thorsten Lemke from Lemkesoft GmbH (developer of Graphic Converter), you can now dispense with a Windows PC to transfer the New South Wales Department of Lands' Topoview DVD Raster 2006 NSW topographical maps to your Macintosh for use in MacGPS Pro. You will need a Macintosh computer with a DVD reader to read the DVD.
I couldn't open the maps from the DVD with anything on the Mac, no matter what I tried. Graphics Converter was supposed to open .ecw files, but I kept getting an error message. I even installed the ExpressView Browser Plug-in (MrSID) for Macintosh thinking the maps may be encoded.
The trick? Copy the .ecw files off the Topoview DVD onto your hard drive before trying to open them with Graphic Converter!
So the process (without PC) is as follows:
- Purchase the Topoview DVD Raster 2006.
- Download Graphic Converter.
- Pay Lemkesoft.
- Find the map you want: use the Topographic Key Maps for New South Wales to get the sheet number and sheet name for the map you want. The Topoview maps are stored on the DVD either by the sheet number of the map or sometimes a version of the name. For example, the file on Topoview containing the Perisher Valley 8525-2S map is 8525s.ecw, but the name for the Youngal 8525-3S map next to it is youg3s.ecw: there is a text file called mapdata.txt that contains all the information to allow you to find the correct file, I'm working on a lookup table solution but you can just open the file and find the filename for the map you want fairly easily.
- Copy the map file from the Topoview DVD to a writeable drive.
- Open the file you copied with Graphic Converter (File>>Open...). The Define ECW import area and scale window will appear. In this window you can scale the map or select a portion of the map to convert. To convert the entire map just click OK.
- Assign no Profile in the Assign Color Profile dialogue box.
- Save the file as a PICT file with the default options.
- In MacGPS Pro, select Import Raster Map or Chart... from the File menu. Choose the file you just saved from Graphic Converter, and click the Open button.
- You will be prompted to save the converted map. Choose a suitable directory and click the Save button.
- Since the file has no geo data associated with it, the following dialogue will appear.

- Click OK. Set the Geodetic Datum to GDA94, and the Map Projection to Transverse Mercator in the Set the map's Datum and Projection type dialogue.

- The map is a UTM Map. See http://www.werple.net.au/~gnb/gps/mapping.html for an overview of the UTM zones in Australia, and enter the appropriate Zone in the UTM Zone: text box. This is the only data you need to enter in this dialogue: the rest of the entries are auto-filled. If you don't get the Zone exactly right, MacGPS Pro will give you an error when you try and calibrate the map in later steps, telling you the coordinates entered are outside the allowed range for the projection etc. Close the file and start again from Step 9.

- Click the OK button. You now have to enter the latitude and longitude of a couple of known points on the map to calibrate it. I use the top left and bottom right of the maps because the latitudes and longitudes are printed on the maps for those points (among others). So click the top left of the map (make sure you have the Show Map Location tool selected: the cross-hairs on the extreme left of the tool bar).

- Click OK in the Click on Known (GDA94) Points to calibrate Map dialogue, navigate to the bottom right of the map window and click there with the Show Map Location tool. Enter the latitude and longitude for that point, click OK, and then click Done (also in the Click on Known (GDA94) Points to calibrate Map dialogue). Your changes will be saved automatically with the map file, so next time you open it the map will be calibrated already.


22 August 2007
Hosting Google Maps in your web pages
Looks like I can now easily host Google Maps on my own pages by simply cutting and pasting some code.
View Larger Map
When you are looking at the map you want to include in your web page at http://maps.google.com/, click Link to this page and copy the html in the second text box. Paste it into your web page and away you go.
View Larger Map
When you are looking at the map you want to include in your web page at http://maps.google.com/, click Link to this page and copy the html in the second text box. Paste it into your web page and away you go.
09 August 2007
Maps data moved to .Mac
I've moved all my tracks and photos from my old impty website to .Mac, since Apple has increased the storage available for the account, and it's simple to buy more space if I need it. The new version of iPhoto also gives a great way of showing photos, including full-size downloads of photos. With the new iWeb, I can apparently include Google Maps in iWeb pages: I'll see if the kml files can be made to work so I can integrate all the bits together in the one place.
Here are the previous tracks:
Here are the previous tracks:
25 June 2007
How to use the Macintosh to geocode media for Google Earth and Maps
Over the weekend I completed a conference paper on using the Macintosh to geocode data for Google Earth and Google Maps. I will transfer it here later this week, but in the meantime you can download the original paper [1.4MB Adobe Acrobat .pdf document]. The paper takes you from original raster topographical maps though loading planned routes into the GPS, taking photos, matching the photos with the track log once you've completed the data collection, geocoding the photos and sharing them through Google Earth and Google Maps.
14 June 2007
How Google Earth Works
Comprehensive article on HowStuffWorks about How Google Earth Works: worth a read.
10 June 2007
Welcome to GPS for Macintosh!
GPS, Global Positioning Systems, is an interest of mine going back to at least to the year 2000 when I purchased my first GPS device, the now-discontinued Garmin eMap that I still use today. It's not my only GPS, but hey, it still works! I live in Canberra, Australia, which gives me great access to walking trails around the region.
I've also been an Apple user since I bought my first Apple II in the early 80s, and my first Macintosh in 1985. I've been frustrated with the lack of Mac support for GPS applications, and have been forced to use a number of PCs for the interfacing the GPS to the computer, particularly for using maps (Garmin's MapSource MetroGuide applications for Australia and Europe). Now there are a number of Mac OS X applications available, the most amazing being Google Maps and Google Earth (particularly the paid version with GPS support).
I've now moved all of the work from the PC to the Macintosh, except for TopoView Raster 2006, a PC only application that I need to get access to the NSW 1:25,000 series raster topographical maps of eastern NSW and the ACT from the New South Wales Department of Lands. I purchased the TopoView Raster 2006 DVD from The Map Shop in Newcastle.
Now that Google Maps has My Maps, I don't know whether it has all been worth it, since it is now so easy to do so much on Google Maps and at little or no cost. But I thought it would be a good idea to document what I've learned in case others are out there trying the find the information out for themselves.
With the imminent arrive of Apple's iPhone, the e911 and e112 regulations in the US and Europe, AGPS (or Assisted GPS) chips for phones, Garmin's announcement of support for Mac OS X, Location Based Services and so on, it's going to be an area of huge growth in interest over the next few years. This blog is about what I know about it.
Subscribe to:
Posts (Atom)
