When you import the PICT file into MacGPS Pro, you have to calibrate it manually because no calibration data is saved with the file when you convert it in Graphic Converter. There isn't any calibration data in the .ecw files, anyway, so it's hardly surprising. You will need the MGA Zone (since each of these files includes the Zone in its title, that's not hard to find), and the north-to-south subzone, represented by a letter between C and X (except I and O). This data (the MGA Zone and the subzone, eg 55J) needs to be entered in the UTM Zone text box in MacGPS Pro.
The easiest way to find this data is to use Google Earth. Google Earth is free but you need to be connected to the Internet for it to work.
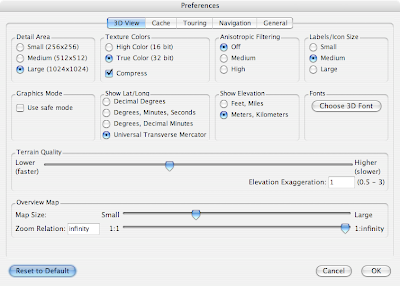
In the Google Earth Preferences... 3D View pane, select the Universal Transverse Mercator option in the Show lat/long section.

Click OK, and use Google Earth to display on the screen the region where the top left of the map you want to calibrate in MacGPS Pro is. As you move the cursor over the map or image window in Google Earth, the UTM coordinates of the cursor is displayed in the bottom left of the window.

The UTM coordinates you need for MacGPS Pro are the two numbers and the letter following "Pointer": in the image above it's 55J. Note this down. The letter doesn't appear to be case sensitive.
To complete the calibration in MacGPS Pro you will also need the latitude and longitude of at least three points on the map, in degrees, minutes and seconds. Google Earth can help you out with this as well.
Go back to Google Earth Preferences..., and change the Show lat/long setting to Degrees, Minutes, Seconds. Click OK, and find three or more points in Google Earth that you can also see in the map you want to calibrate. As you move the cursor around the window, the Pointer display at the bottom left will show the latitude and longitude in the format you will need to use in MacGPS Pro.

In Google Earth, note the latitude and longitude for at least three points. Choose points spread as widely as possible throughout the map. It's a good idea to note the coordinates of an additional point or two to check the accuracy of the calibration.
Go into MacGPS Pro, import the map file you converted using Graphic Converter, and enter the zone data in the UTM Zone text box. Find the points on the map that you know the latitude and longitude for, click them with the Show Map Location Tool, and enter the data in the Calibrate Map dialogue.
 When you've entered enough points (at least two), the DONE button is undimmed and you can click it to complete the calibration process. Don't forget to put a minus sign (-) in front of the latitude to show it's south of the equator.
Once the map is calibrated, choose Find Coordinates... from the Edit menu to search for another location on the map you know the coordinates for to check the accuracy of the calibration.

No comments:
Post a Comment