Now that I use Maperture Pro to geocode my images inside Aperture, getting the camera time accurate is even more important. Offsetting the time is possible in Maperture Pro, but if the camera time is accurate it's much easier to geocode the images and cuts out a potentially problematic step.
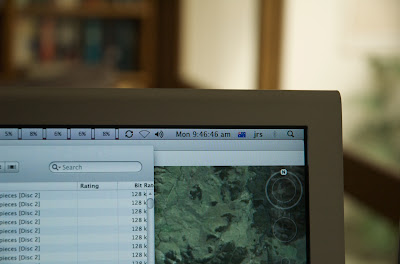
I have the display on my computer set to show seconds as well as hours and minutes. In the Date & Time System Preference it's set to sync the date and time automatically, so it should be accurate within a few seconds of the satellite time on the GPS. Just before I go out shooting I use the clock on the computer screen to set the camera, then shoot a shot of the clock to confirm the correspondence.
If you download the image below and check the Exif data, the date and time of the original image match the time captured in the image.
29 September 2009
05 September 2009
VicMap 1:25k topo maps and MacGPS Pro
The 1:25k topo maps for the whole of Victoria are now available through MapTrax. There is a package of sample files available for download to check whether the VicMap maps will work with your application: they are designed to work with Ozi Explorer on the PC, but if you want to run them on the Macintosh you will have to use your own application since Ozi Explorer doesn't run on the Mac. I downloaded the sample package but the .ecw file in the package would not import into MacGPS Pro with the coordinates set.
I wrote to James Associates and Larry James was quick to respond with the answer: when you try to import an .ecw file, MacGPS Pro looks for a .map file in the same folder with the same name if it can't find the georeferencing information in the file itself.
Unfortunately the .map files are named differently from the .ecw files they relate to, but the fix is simple: rename the .map file with the same name as the .ecw file (or vice versa), just keep the original extensions, .ecw or .map. Now when you import the .ecw file it finds the .map georeference file and sets the coordinates automatically.
So I bought the set. 846 maps. I copied the entire ECW VicGrid folder across from DVD 1 to the hard drive, took the "georef25k_" off the beginning of all the filenames using the freeware Name Mangler, then went through all the files manually and renamed the .ecw files with the same name as the .map files: I couldn't think of an easy programmatic way of doing it. So now I just find the .ecw file of the map I need and import it into MacGPS Pro.
To find the map I want, I've converted the mapping_program_25kindex.pdf file into several PICT files using Graphic Converter, then manually added the coordinates (using the .ecw files to find coordinates). I've assumed the projection is Transverse Mercator and the geodetic datum is GDA94, which isn't exactly true, but it gives enough of an indication of which topo maps to look on for a waypoint created on Google Earth or in MacGPS Pro.
05 July 2009
Overlaying a topographic map on Google Earth
Overlaying a topographic map on Google Earth with the Terrain layer on adds significantly to the information available in the GE view. It would be much simpler if Google Earth supported the .ecw file format: ecw files of the NSW Raster Topographic Maps contain the location data for the map, so the maps could be located automatically on import.
As it is the locations have to be done manually.
Set the transparency of the overlay to 50% or less to get the effect in the image above.
Ensure the Terrain layer is active to see the map draped over the terrain.
The documentation for LatLonQuad details the format of the kml file required to display the map tile properly.
As it is the locations have to be done manually.
- Convert .ecw map to an image file format that Google Earth understands (eg. TIFF, JPG, PNG).
- Cut the map up into tiles in PhotoShop, to the required tile size. Note that a complete topo map will pixelate in GE so make it about one quarter of a 1:25k map per tile. Trim along grid lines to make the following steps easier.
- Import the original .ecw file in MacGPS Pro.
- Use MacGPS Pro to find the latitude and longitude of the corners of each tile from the trimmed map, in decimal degree format.
- In Google Earth, Add an Image Overlay, and link it to the map tile.
- Open the Location tab in the Layer object Get Info window, and click the Convert to LatLonQuad button.
- Click OK to close the Get Info window, then open it again by right-clicking the Overlay in the My Places pane (you have to do this, at least on the Mac, to get the display to change to the four tuple pane).
- Click the Location tab. There should now be four coordinate tuples in the window.
- Replace the values with the co-ordinates found in Step 4 above. The First Corner is the bottom left, Second Corner is bottom right, and so on around the tile anti-clockwise.
- Click OK to close the Get Info window, and providing you have recorded and entered the values for the corners accurately the tile should now be in place.
Set the transparency of the overlay to 50% or less to get the effect in the image above.
Ensure the Terrain layer is active to see the map draped over the terrain.
The documentation for LatLonQuad details the format of the kml file required to display the map tile properly.
Subscribe to:
Posts (Atom)