The more I see of Photosynth, the more I want to see something like it on the Macintosh, but done better using Core Animation in Leopard.
14 November 2007
03 November 2007
Live Maps 3D
Microsoft has integrated Photosynth in Live Maps Virtual Earth 3D (technology preview). No audio in the video, apparently.
Got this from vincenthome.
Why this in a Macintosh blog on GPS? Hoping to see this sort of technology available on the Mac (Virtual Earth 3D requires ActiveX controls)
Got this from vincenthome.
Why this in a Macintosh blog on GPS? Hoping to see this sort of technology available on the Mac (Virtual Earth 3D requires ActiveX controls)
02 November 2007
Using Panoramio
I've been experimenting with Panoramio to simplify serving up geocoded photographs: have a look at a track and the photos from a recent walk in the Warrumbungle National Park. Download the .kmz file and open it in Google Earth. As you change the view on the map, only the photos available in the area covered are included in the list.
29 October 2007
Cool new Leopard Preview feature
I've just come back from a couple of weeks away and while geocoding the photos using the usual tools and now Geotagger from Craig Stanton (Craig also developed the iPhotoToGoogleEarth plugin for iPhoto 6 that I use), I discovered that Preview in Leopard on the Macintosh has a cool new feature when you use it to look at geocoded photographs.
Try this at home:
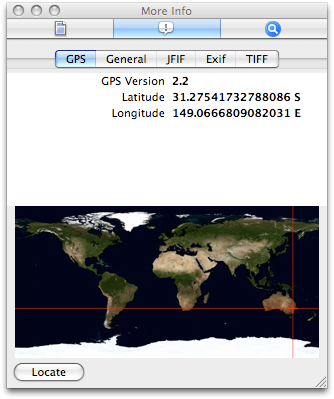
You should see the location data for the photo and the photo's location on the map. Click the Locate button to see the location of the photo in Google Maps.
Try this at home:
- Open a geocoded photo in Preview v4. If you don't have a geocoded photo, here's one of the Warrumbungle National Park from Siding Springs [warning: 4.7MB file] that I prepared earlier. Save it to disk before opening in.
- Choose Inspector from the Tools menu.
- Click the 'i' tab in the Inspector window at the top in the centre.
- Click the GPS tab in the second line of tabs in the Inspector window.

You should see the location data for the photo and the photo's location on the map. Click the Locate button to see the location of the photo in Google Maps.
25 September 2007
Links to Macintosh GPS tools
These are the links to the tools I used in my GPS for the Mac presentation at the Apple University Consortium Conference at the Royal Pines Resort, Gold Coast, on 24 September 2007.
- Graphic Converter
- MacGPS Pro
- GPSBabel +
- PhotoGPSEditor
- iPhoto + iPhotoToGoogleEarth
- Google Earth
- StuffitExpander
- BBEdit
- Safari
Here's the GPS Mac presentation in Acrobat format (.pdf, 668kB), and the paper in Word (.doc, 5.6MB).
16 September 2007
Canberra Nature Parks maps
Here in the ACT the local government has published a series of Acrobat maps of the the local Nature Parks. Download the maps and import them into MacGPS Pro (it will open the PDF file directly). The ones I've tried work with the Geodetic Datum set to GDA94; Map Projection to Transverse Mercator; and UTM Zone to 55H. Calibrate the map using Google Earth (see Calibrating NATMAP Raster Premium Maps for the technique). You should independently verify the calibration before relying on the maps for navigation.
15 September 2007
Google Maps to your GPS via MacGPS Pro
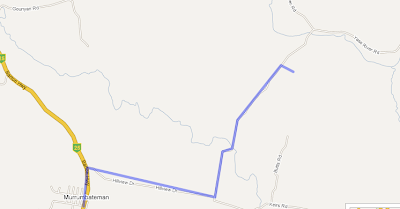
Last weekend we wanted to visit a local winery (Yarrh, pronounced yaar) to try their Sangiovese. From their website map I could see where to go, but thought it would be a good exercise to see if I could transfer the data from Google Maps to my Garmin GPS to guide us there.
Turns out it's quite simple with My Maps (make sure you are logged in to Google: the link takes to you to maps.google.com.au), together with TakItWithMe - Google™ My Maps Converter Beta, and MacGPS Pro.
 Google My Maps line tool
Once logged in to My Maps, create a new map and use the line tool to draw a line from the beginning to the end of the route.
Turns out it's quite simple with My Maps (make sure you are logged in to Google: the link takes to you to maps.google.com.au), together with TakItWithMe - Google™ My Maps Converter Beta, and MacGPS Pro.
 Google My Maps line tool
 Once logged in to My Maps, create a new map and use the line tool to draw a line from the beginning to the end of the route.
Click at each intersection along the route to draw the route. Double click at the destination to finish the route.
Save the map.
 Graphic of the Link to this page link
Click the Link to this page link, and copy the data in the text field under Paste link in email or IM heading.
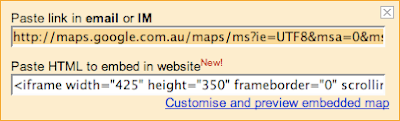
Go to the TakItWithMe website, and paste the data you copied into the Paste in Your Google My Maps URL text field. Click the Download GPX button.

You can then transfer the GPX file to your GPS device, for example using MacGPS Pro. Open MacGPS Pro, open the gpx file you just created, select the route using the Route tool (select the route tool; click one of the waypoints on the route) and transfer the route file to the GPS using the transfer tool.

Save the map.
 Graphic of the Link to this page link
Go to the TakItWithMe website, and paste the data you copied into the Paste in Your Google My Maps URL text field. Click the Download GPX button.

You can then transfer the GPX file to your GPS device, for example using MacGPS Pro. Open MacGPS Pro, open the gpx file you just created, select the route using the Route tool (select the route tool; click one of the waypoints on the route) and transfer the route file to the GPS using the transfer tool.
Another way to do it would be to create Placemarks (rather than a line) in My Maps, then transfer these to MacGPS Pro via a GPX file using this same method. Create a new route in MacGPS Pro between the Placemarks (which become Waypoints in MacGPS Pro). If you have named the Placemarks meaningfully in My Maps you should get a route with meaningful names for Waypoints on the GPS.
Subscribe to:
Posts (Atom)
